Home
>
How To E Verify Your Income Tax Return

If you have already filed your Income Tax Return, the next thing you have to do is verify it.
Do you want to learn ‘how to e-Verify income tax return’? Then keep reading!
Before we get into the verification of your ITR, let’s find out what is Income Tax Return.
ITR or Income Tax Returns are a way to provide information about your income and taxes to the Income Tax Department.
Everyone is liable to pay taxes as per their income. If you end up paying excess tax, you will be eligible for a refund. But you will only get refunds if you file and verify your Income Tax Returns. Additionally, your ITR will be treated as invalid if you don’t verify it.
Thus, it is essential for you to submit and verify your ITR within the applicable due dates.
There are multiple ways to e-verify your ITR, and they are mentioned here -
Using Digital Signature Certificate (DSC)
After Generating Aadhaar OTP
Using Existing Aadhaar OTP
Using Existing Electronic Verification Code (EVC)
After Generating Electronic Verification Code (EVC) Through Bank Account
After Generating Electronic Verification Code (EVC) Through Demat Account
Using Net Banking
Take a look at each of these methods in detail, along with the steps involved.
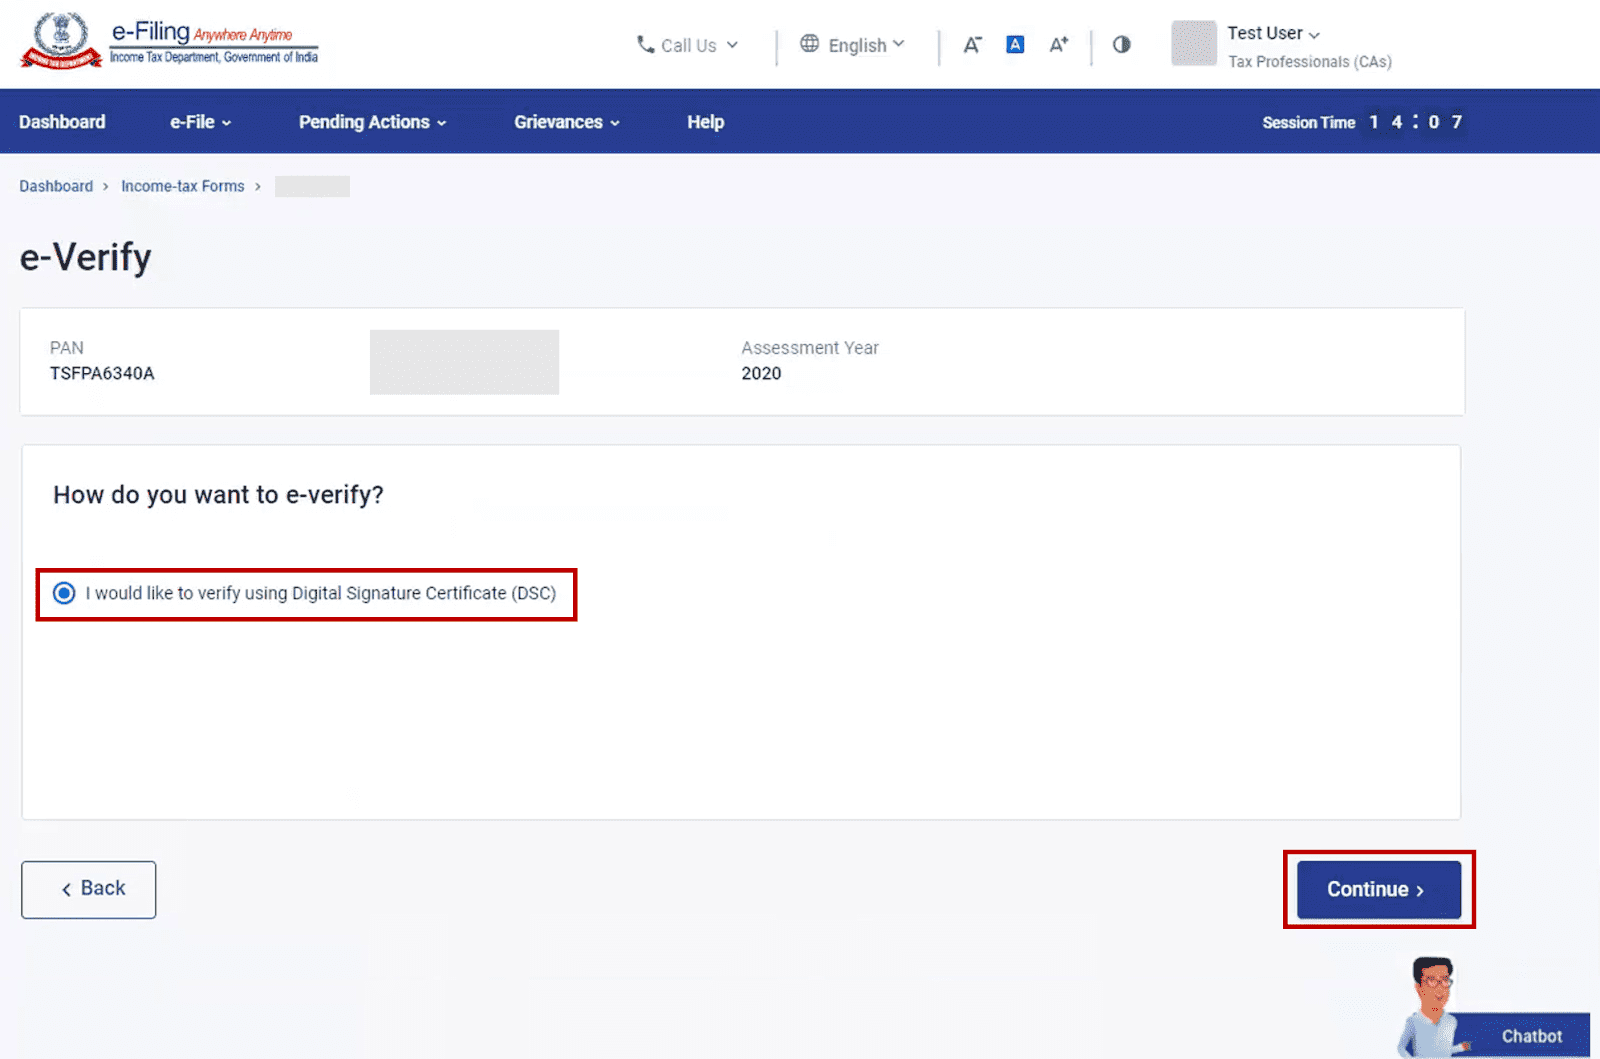
This method of e-verification can be used only if you choose to verify your ITR immediately after filing your returns. So, make sure not to choose the ‘I will verify Returns Later’ option.
Then, you can follow these steps to e-verify your Income Tax Returns -
STEP-1: On the e-Verify page, choose the option ‘I would like to e-Verify using Digital Signature Certificate (DSC)’.
STEP-2: On the ‘Verify Your Identity’ page, select ‘Click here to download emSigner utility’. You will find it under the ‘Need Help?’ section.
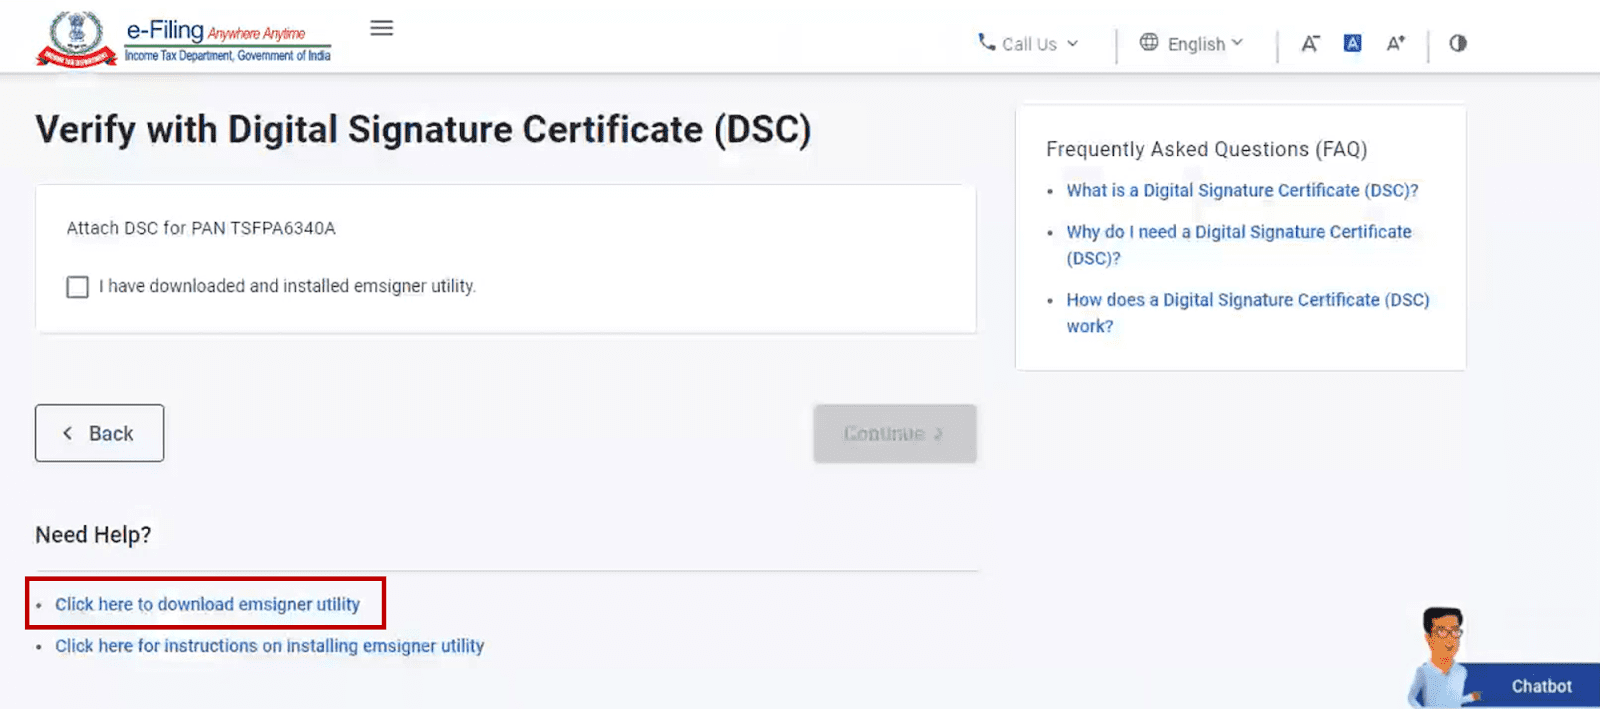
STEP-3: After you have downloaded and installed the emSigner utility, select ‘I have downloaded and installed emSigner utility’ on the same page. Finally, click on ‘Continue’.
STEP-4: You will be taken to the ‘Data Sign’ page. Here, you can select your ‘Provider’, ‘Certificate’, and enter the ‘Provider Password’.
STEP-5: Once done, click on ‘Sign’.

You will see a success message page that will be displayed along with a Transaction ID. You are advised to note down the Transaction ID for future use. You will also receive confirmation messages on your registered email ID and mobile number.
If you want to know how to e-verify income tax return after generating a new Aadhaar OTP, just follow these steps -
STEP-1: On the e-Verify page, choose the option ‘I would like to verify using OTP on the mobile number registered with Aadhaar’ and click on ‘Continue’.
STEP-2: On the ‘Aadhaar OTP’ pop-up that opens, select the ‘I agree to validate my Aadhaar Details’ option and click on ‘Generate Aadhaar OTP’.
STEP-3: Wait till you receive a 6-digit OTP on the mobile number that you have registered with Aadhaar.
STEP-4: Enter the OTP on the ‘Verify OTP’ pop-up and click on ‘Validate’.
Please note that OTP will be valid for only 15 minutes, and you will have only 3 attempts to enter the correct OTP.
Once your OTP is validated, you will see a success message on your screen which will also display a Transaction ID. You should keep a note of the Transaction ID for future use. You will also receive confirmation messages on your registered email ID and mobile number.
If you already have an OTP on your registered mobile number and want to e-verify your ITR using it, follow these steps -
STEP-1: On the e-verify page, choose the option ‘I already have an OTP on Mobile number registered with Aadhaar’.
STEP-2: Enter the 6-digit OTP that you have, and click on ‘Continue’.
Please note that OTP will be valid for only 15 minutes, and you will have only 3 attempts to enter the correct OTP.
Once your OTP is validated, you will see a success message on your screen which will also display a Transaction ID. You are suggested to keep a note of the Transaction ID for future use. You will also receive confirmation messages on the email ID and mobile number that is registered on the e-Filing portal.
The process of e-verification using an existing verification code or EVC involves only two steps. They are mentioned below -
STEP-1: Select the option ‘I already have an Electronic Verification Code (EVC)’, on the e-Verify page.
STEP-2: Enter the EVC that you have in the ‘Enter EVC’ textbox and click on ‘Continue’.
You will receive a success message along with a Transaction ID and EVC on the screen. Don’t forget to take a note of the Transaction ID and EVC for future reference. You will also receive confirmation messages on the email ID and mobile number that is registered on the e-Filing portal.
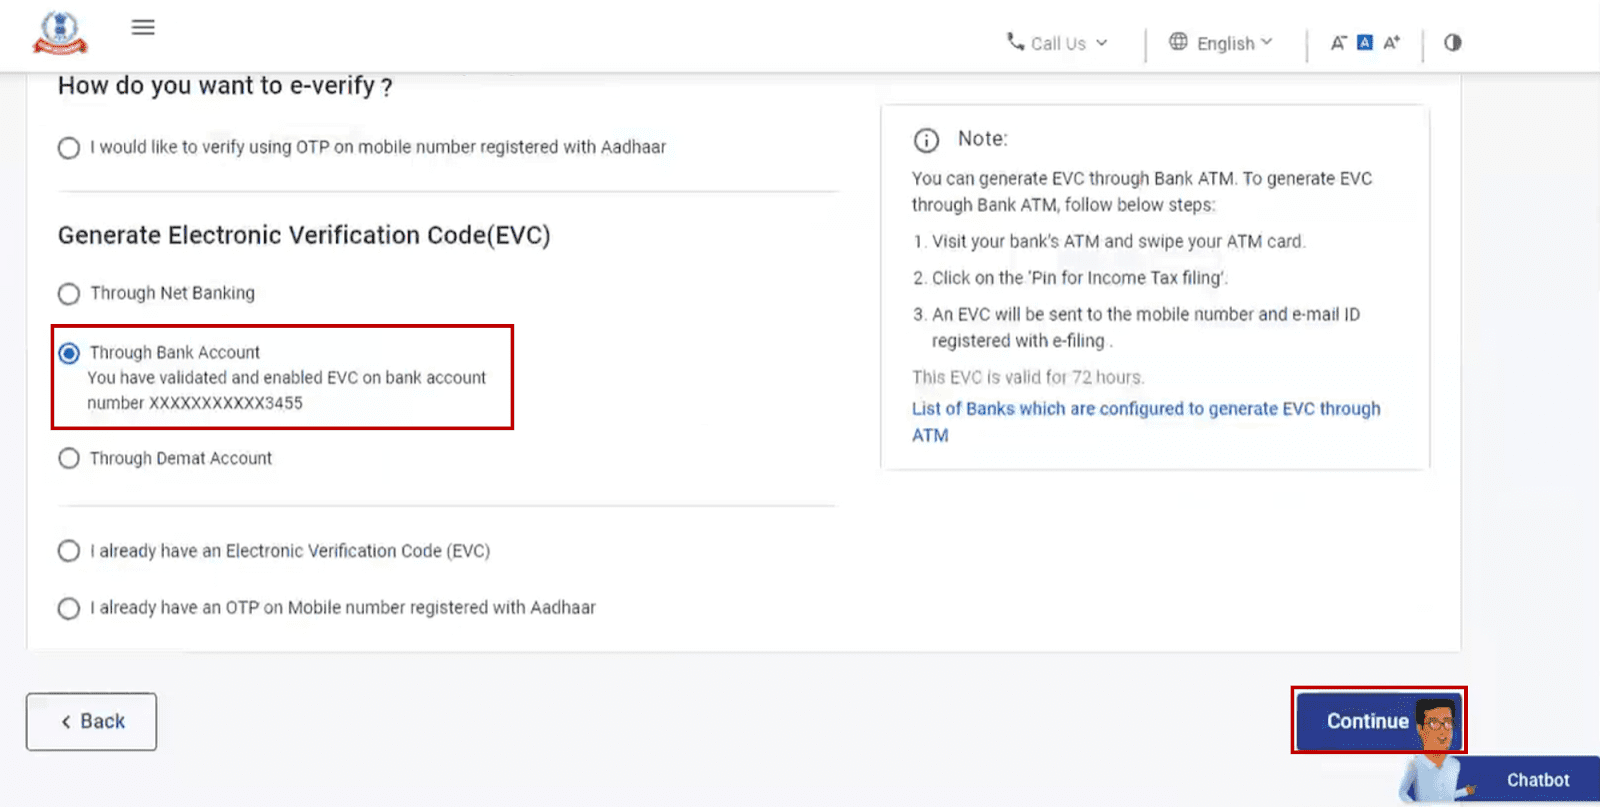
The process of e-verification after generation of an EVC through your bank account is pretty straightforward. Take a look at the steps below -
STEP-1: When you are on the e-Verify page, choose the option ‘Through Bank Account’ under the ‘Generate Electronic Verification Code (EVC)’ section.
STEP-2: Once done, click on ‘Continue’.
STEP-3: You will receive the generated EVC on your mobile number and email ID that is registered with your pre-validated and EVC enabled bank account.
STEP-4: Enter the EVC that you have received in the ‘Enter EVC’ textbox.
STEP-5: Finally click on the ‘e-Verify’ button towards the right side bottom of the screen.
After completion of the process, a success message along with a Transaction ID and EVC will be displayed on the screen. Remember to take a note of the Transaction ID and EVC for future reference. You will also receive confirmation messages on your registered email ID and mobile number.
Want to know how to e-verify income tax return after generating an EVC through your Demat account? Just follow these steps -
STEP-1: Once you are on the e-Verify page, select the ‘Through Demat Account’ option. You will find it under the ‘Generate Electronic Verification Code (EVC)’ section.
STEP-2: Click on ‘Continue’.
STEP-3: Once the EVC is generated, you will receive it on your mobile number and email ID that is already registered with your pre-validated and EVC-enabled demat account.
STEP-4: Enter the EVC in the ‘Enter EVC’ textbox and click on ‘e-Verify’.
You will be able to see a success message page containing a Transaction ID and EVC. Take note of the Transaction ID and EVC for future reference. You will also receive confirmation messages on the email ID and mobile number that is registered on the e-Filing portal.
You can easily e-verify your ITR using Net Banking as well. To do so, follow these steps -
STEP-1: On the e-Verify page, select ‘Through Net Banking’ from the ‘Generate electronic verification code (EVC)’ section. Then, click on ‘Continue’.
STEP-2: Choose your bank on the ‘Login with net banking’ screen, and click on ‘Continue’.

STEP-3: A disclaimer will pop-up on the screen. Click on ‘Continue’ once you have read and understood it.
STEP-4: You will be redirected to the Net Banking login page of your bank, where you must login using your credentials.
STEP-5: Click on the link to log in to e-Filing from your bank's website. You will be logged out of your bank website, and logged in to the e-Filing portal.
STEP-6: If the login was successful, you will find yourself on the e-Filing Dashboard. Go to the ‘ITR’ option and click on ‘e-Verify’.
With this, your ITR will be successfully e-verified and you will see a success message and a Transaction ID. Please note the Transaction ID for future reference. A confirmation message will also be sent to your email ID and mobile number.
If you did not e-verify your returns immediately after filing your income tax returns, you can do it later as well. These are the two ways in which you can do so -
Pre-Login
Post-Login
These steps can be followed if you want to e-verify your income tax returns without logging in -
STEP-1: Visit the e-Filing portal homepage and click on ‘e-Verify Return’.
STEP-2: On the ‘e-Verify Return’ page, enter your PAN and select the Assessment Year applicable to you.
STEP-3: On the same page, enter the Acknowledgement Number of the ITR that you had filed, your mobile number, and click on ‘Continue’.
STEP-4: You will receive an OTP on the mobile number you typed in the previous step. Enter the 6-digit OTP, and click on ‘Submit’.
STEP-5: If you are e-Verifying your returns after 30 days of filing, click on ‘Ok’.
But, if you are e-Verifying the return within 30 days of filing, proceed to Step-7 directly.
STEP-6: On the next screen, select the ‘Reason of Delay’ from the dropdown, and click on ‘Continue’.
STEP-7: After this you can choose any way mentioned in the ‘How To e-verify Income Tax Return Immediately After Filing ITR’ section to complete your e-verification.
You can follow these steps to e-verify your income tax returns after logging in -
STEP-1: Visit the e-Filing portal and login using your credentials.
STEP-2: Go to ‘e-File’ → ‘Income tax return’ → ‘e-Verify Return’.
STEP-3: When you are on the ‘e-Verify Return’ page, click on the ‘e-Verify’ against the one that you have not verified.
STEP-4: If you are e-verifying your returns after 30 days of filing, click on ‘Ok’.
But, if you are e-verifying the return within 30 days of filing, proceed to Step-6 directly.
STEP-5: On the next screen, select the ‘Reason of Delay’ from the dropdown, and click on ‘Continue’.
Related Aadhaar Articles:
How to Change Mobile Number in Aadhar Online
How to Check Aadhaar Card Link with Mobile Number
How to Download Aadhar card Download without Mobile Number
How to Change Date of Birth in Aadhar Card
How to Change Mobile Number in Aadhar without OTP
How to Link EPF Account with Aadhar
Income Tax Aadhar Link
Aadhar Bank Link
Link Aadhaar with Mobile Number
Pan Aadhaar Link
Link Voter ID with Aadhaar Card
Link UAN with Aadhaar Card
Ration Card Aadhar Link
Download E-Aadhaar Card
Now that you know ‘what is income tax return’, you can understand how important it is to file your Income Tax Returns. In case you have paid extra tax, you are liable to get refunds only if you file and verify your returns.
You can verify your Income Tax Returns both online or offline. You can do it immediately after you file your ITR, or even later. As you read here, there are many methods to e-verify your ITR and you can choose any one of them.
The prerequisites to e-verify your ITR using netbanking are as follows -
Tax, Filing & Linking Guide
Banking & Investment Tips
Fixed Deposit Insights and Guides
Credit Card Insights
Recurring Deposit Insights and Guides
Aadhaar Card Help and Update Guides
Disclaimer
The starting interest rate depends on factors such as credit history, financial obligations, specific lender's criteria and Terms and conditions. Moneyview is a digital lending platform; all loans are evaluated and disbursed by our lending partners, who are registered as Non-Banking Financial Companies or Banks with the Reserve Bank of India.
This article is for informational purposes only and does not constitute financial or legal advice. Always consult with your financial advisor for specific guidance.
Was this information useful?
